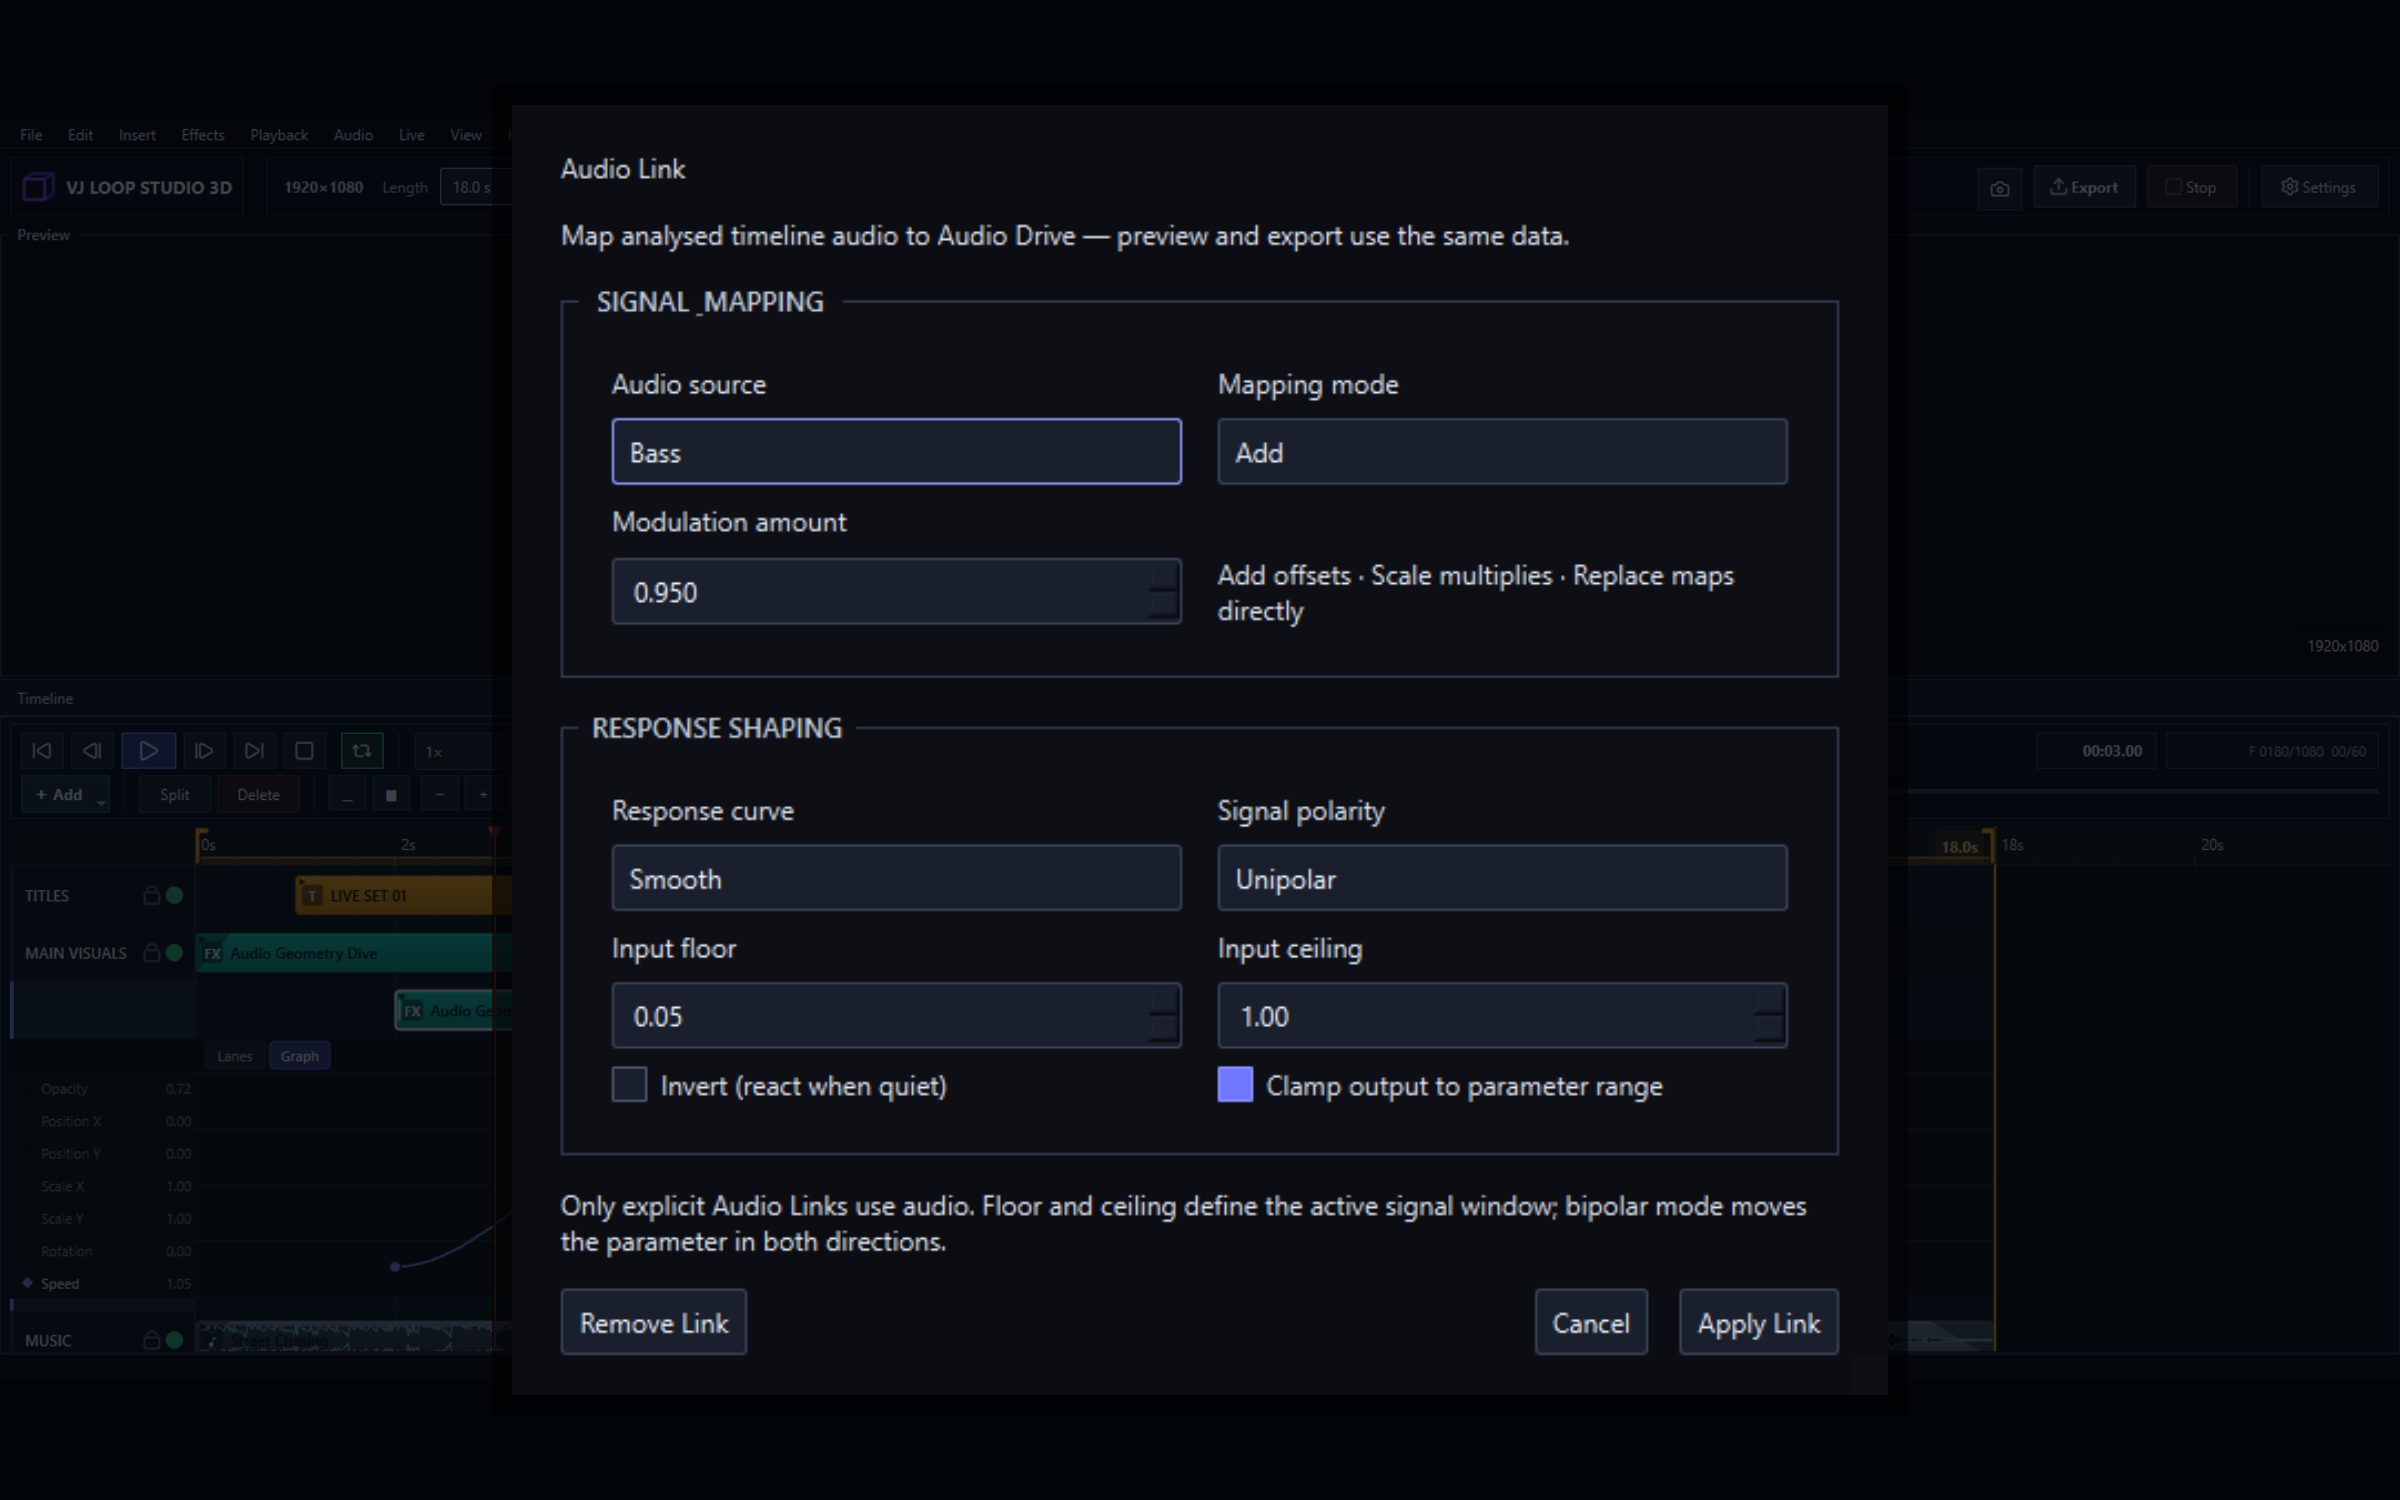
Two systems drive motion in VJ Loop Studio 3D: Audio Link, which follows real sound, and modulators, which generate their own. They target the same thing — any numeric parameter on a clip — and they are often best used together. This guide covers both, and the one behaviour that surprises people: why a render does not match the live preview exactly.
Audio reactivity at a glance
| Audio sources | Bass, Midrange, Treble, Loudness (RMS), Detected Beat, Low Blend, High Blend, Body, Spectral Brightness |
|---|---|
| Modulator shapes | Sine, Triangle, Saw, Envelope, Random Step, Sample & Hold, Macro |
| Route modes | Add or multiply, unipolar or bipolar |
| Tempo | Tap tempo, project BPM, tempo-synced modulators |
| Targets | Any numeric effect parameter, per clip |
Audio Link: following real sound
Every numeric parameter in the inspector has a small ~ button beside it. Click it to open the Audio Link editor for that parameter.
An Audio Link has three parts:
- Source — which measurement of the audio drives it.
- Range — the minimum and maximum the parameter is allowed to reach.
- Amount — how strongly the source pushes the value across that range.
Because the range is explicit, a link can never send a parameter somewhere the effect cannot handle. Setting a wide range and a small amount gives a subtle response; a narrow range with a large amount gives a hard, switch-like one.
The nine sources, and what each is for
| Source | Moves with | Good for |
|---|---|---|
| Bass | Low-frequency energy | Kick-locked scale, zoom, strobe |
| Midrange | Mid-band energy | Vocals and leads; colour shifts |
| Treble | High-frequency energy | Hi-hats; fine detail, sparkle, line width |
| Loudness (RMS) | Overall level | Master intensity, global glow |
| Detected Beat | Beat detection, not raw level | Scene triggers, hard hits, flashes |
| Low Blend | Smoothed low end | Slow parameters: fog, camera speed |
| High Blend | Smoothed high end | Shimmer, gentle colour drift |
| Body | Weight of the mix | Anything that should feel like the track’s mass |
| Spectral Brightness | Where the energy sits, not how much | Palette position, hue, glow temperature |
The two Blend sources exist because raw bands are twitchy. A parameter like Ring Density on a tunnel looks wrong when it jumps every kick — use Low Blend and it breathes with the track instead.
A worked example: a tunnel that breathes
On a Triangle Rush clip:
- Ring Density ← Low Blend, small amount. The corridor stretches and compresses slowly with the low end.
- Core Glow ← Bass, large amount, narrow range. The vanishing point punches on every kick.
- Colour Flow ← Spectral Brightness. The palette drifts as the filter opens.
- Corner Flash ← Detected Beat. The triangle corners snap on the beat, not on level.
Four links, four different characters of motion. Routing all four to Bass would give you one motion at four amplitudes, which is the most common mistake.
Modulators: motion without audio
Modulators generate their own signal. They are per-parameter like Audio Link, and they matter for three situations: no audio is loaded, the audio is playing on someone else’s mixer, or you want motion that is deliberately independent of the music.
Seven shapes are available:
- Sine — smooth, symmetrical. The default for breathing motion.
- Triangle — linear up and down; more mechanical than sine.
- Saw — ramps and resets. Rotation, scroll, anything that should cycle.
- Envelope — one-shot attack/decay rather than a repeating cycle.
- Random Step — jumps to a new value at a set rate.
- Sample & Hold — samples its input and holds it until the next trigger.
- Macro — a value you drive yourself, so one control can move several parameters.
Each modulator routes with a mode and a polarity:
- Add offsets the parameter; multiply scales it. Multiply keeps a parameter at zero when its base value is zero, which is what you want for anything that should stay off until you raise it.
- Unipolar moves in one direction from the base value; bipolar swings either side of it.
Modulators can be tempo-synced to the project BPM, so a saw can complete exactly one cycle per bar regardless of tempo.
Tempo: tap it, then trust it
Set the project BPM, or use Tap Tempo — it is one of the global MIDI actions, so it can live on a pad. Everything tempo-synced follows it: modulator rates, and any timing that is expressed in bars rather than seconds.
Tapping tempo during a set and letting synced modulators re-lock is usually faster than trying to nudge individual rates.
Live versus exported: the one thing to understand
This trips people up, so it is worth being precise:
- The live preview and live outputs analyse your live input device in real time.
- An export analyses the project’s audio file offline, ahead of the frames it is rendering.
These cannot produce identical results, and they are not meant to. Live analysis is causal — it only knows what has already been heard. Offline analysis can look ahead, so it lands transients exactly on frame and gives the same output every time you render. Export never samples the live input, precisely so a render is reproducible.
Practically: build and judge a render using the project audio file, and treat the live preview as a performance instrument rather than a preview of the file you will export.
Combining both
The strongest audio-reactive looks usually layer the two systems:
- A modulator provides the continuous underlying motion — a slow saw on rotation, a sine on camera drift.
- An Audio Link provides the accents — bass on glow, beat on flash.
The result keeps moving during a quiet passage instead of freezing, and still hits hard when the track does.
Frequently asked questions
- How do I make an effect react to the music?
- Select the clip, find the parameter you want to move, and click the
~button beside it to open Audio Link. Pick an audio source such as Bass or Detected Beat, set the amount, and the parameter now follows the audio within the range you set. - What is the difference between Bass and Low Blend?
- Bass is a single low-frequency band, so it tracks a kick drum tightly and returns to zero between hits. Low Blend mixes the low end more smoothly, which gives a slower-moving value better suited to things like scale or fog that would look twitchy on a per-kick response.
- Why does my exported video react differently from the live preview?
- Because they analyse different audio. The live preview reacts to your live input device in real time; an export analyses the project’s audio file offline, frame by frame. The offline pass is deterministic and repeatable, which is what you want in a render — but it cannot match a live-input performance sample for sample, and export deliberately never samples the live input.
- Can I use audio reactivity without any audio file?
- Yes. Use the modulators instead — sine, triangle, saw, envelope, random step, sample & hold, or macro. They can be tempo-synced to the project BPM, so a visual can pulse in time with a track that is playing elsewhere without the app hearing anything.
- What does Spectral Brightness do?
- It tracks where the energy sits in the spectrum rather than how much there is. A track that stays at constant loudness but opens a filter will move Spectral Brightness while RMS stays flat — useful for driving colour or glow rather than scale.
- Does audio reactivity work with a live DJ input?
- Yes, for the live preview and live outputs. Select your input device and the analysis runs on it in real time, so Spout, NDI, and the fullscreen output all react to what is actually playing in the room.
Where to go next
- Setting up for a live set — MIDI, outputs, and blackout.
- Send visuals to Resolume, OBS, and TouchDesigner — Spout and NDI routing.
- Colour and material workflow — palettes, projection, and grading.